Chapter 5: Network Manager
NOTE: The standard way to generate entanglement is to use the app module, which is discussed in chapter 6. The purpose of this chapter is to explain what is happening under the hood in the network management module.
In this tutorial, we will showcase the (default and distributed) Network Management module of SeQUeNCe and show its operation on a typical network. The goal of this tutorial is to
Gain familiarity with the
network_managementmoduleGain familiarity with the
topology.topologymoduleUsing external files to build networks
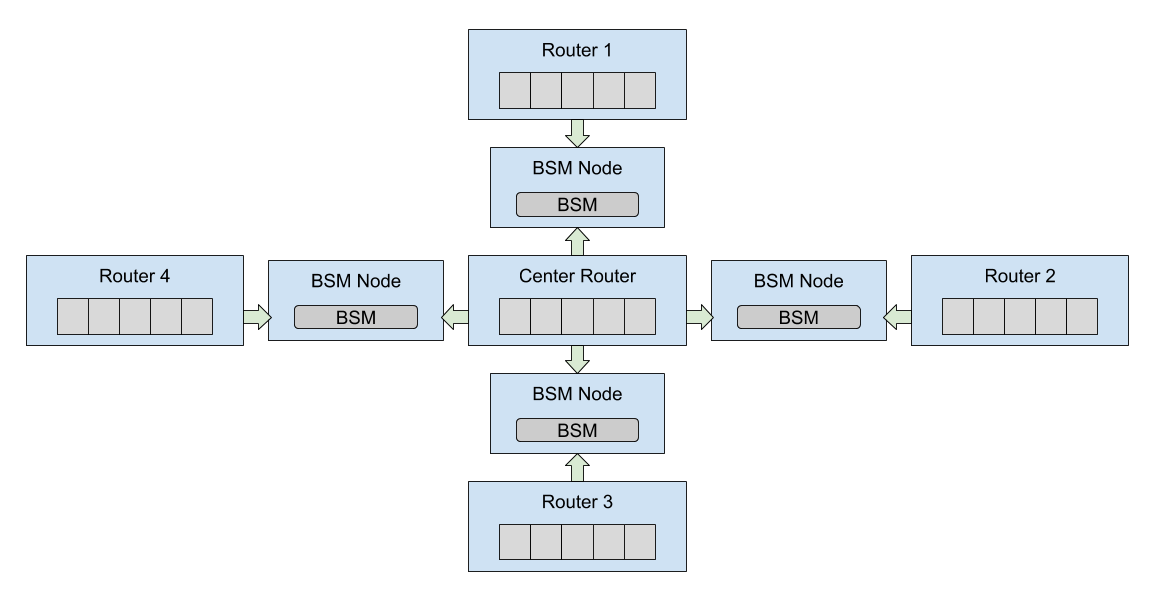
To achieve this, we will be using an example json file to build our network and will use the network manager on QuantumRouter nodes to request entanglement pairs. The json file will create the network topology shown below:
This example is similar to the example jupyter notebook script random_request_network.ipynb, without applications and with slightly different parameters. The notebook can be viewed in the example directory of the SeQUeNCe download, including already written code and interactive input.
Background
The Network Management module of sequence is responsible for coordinating the protocols of network nodes, ensuring the proper and efficient completion of application requests. This is done with an internal protocol stack, as shown below:
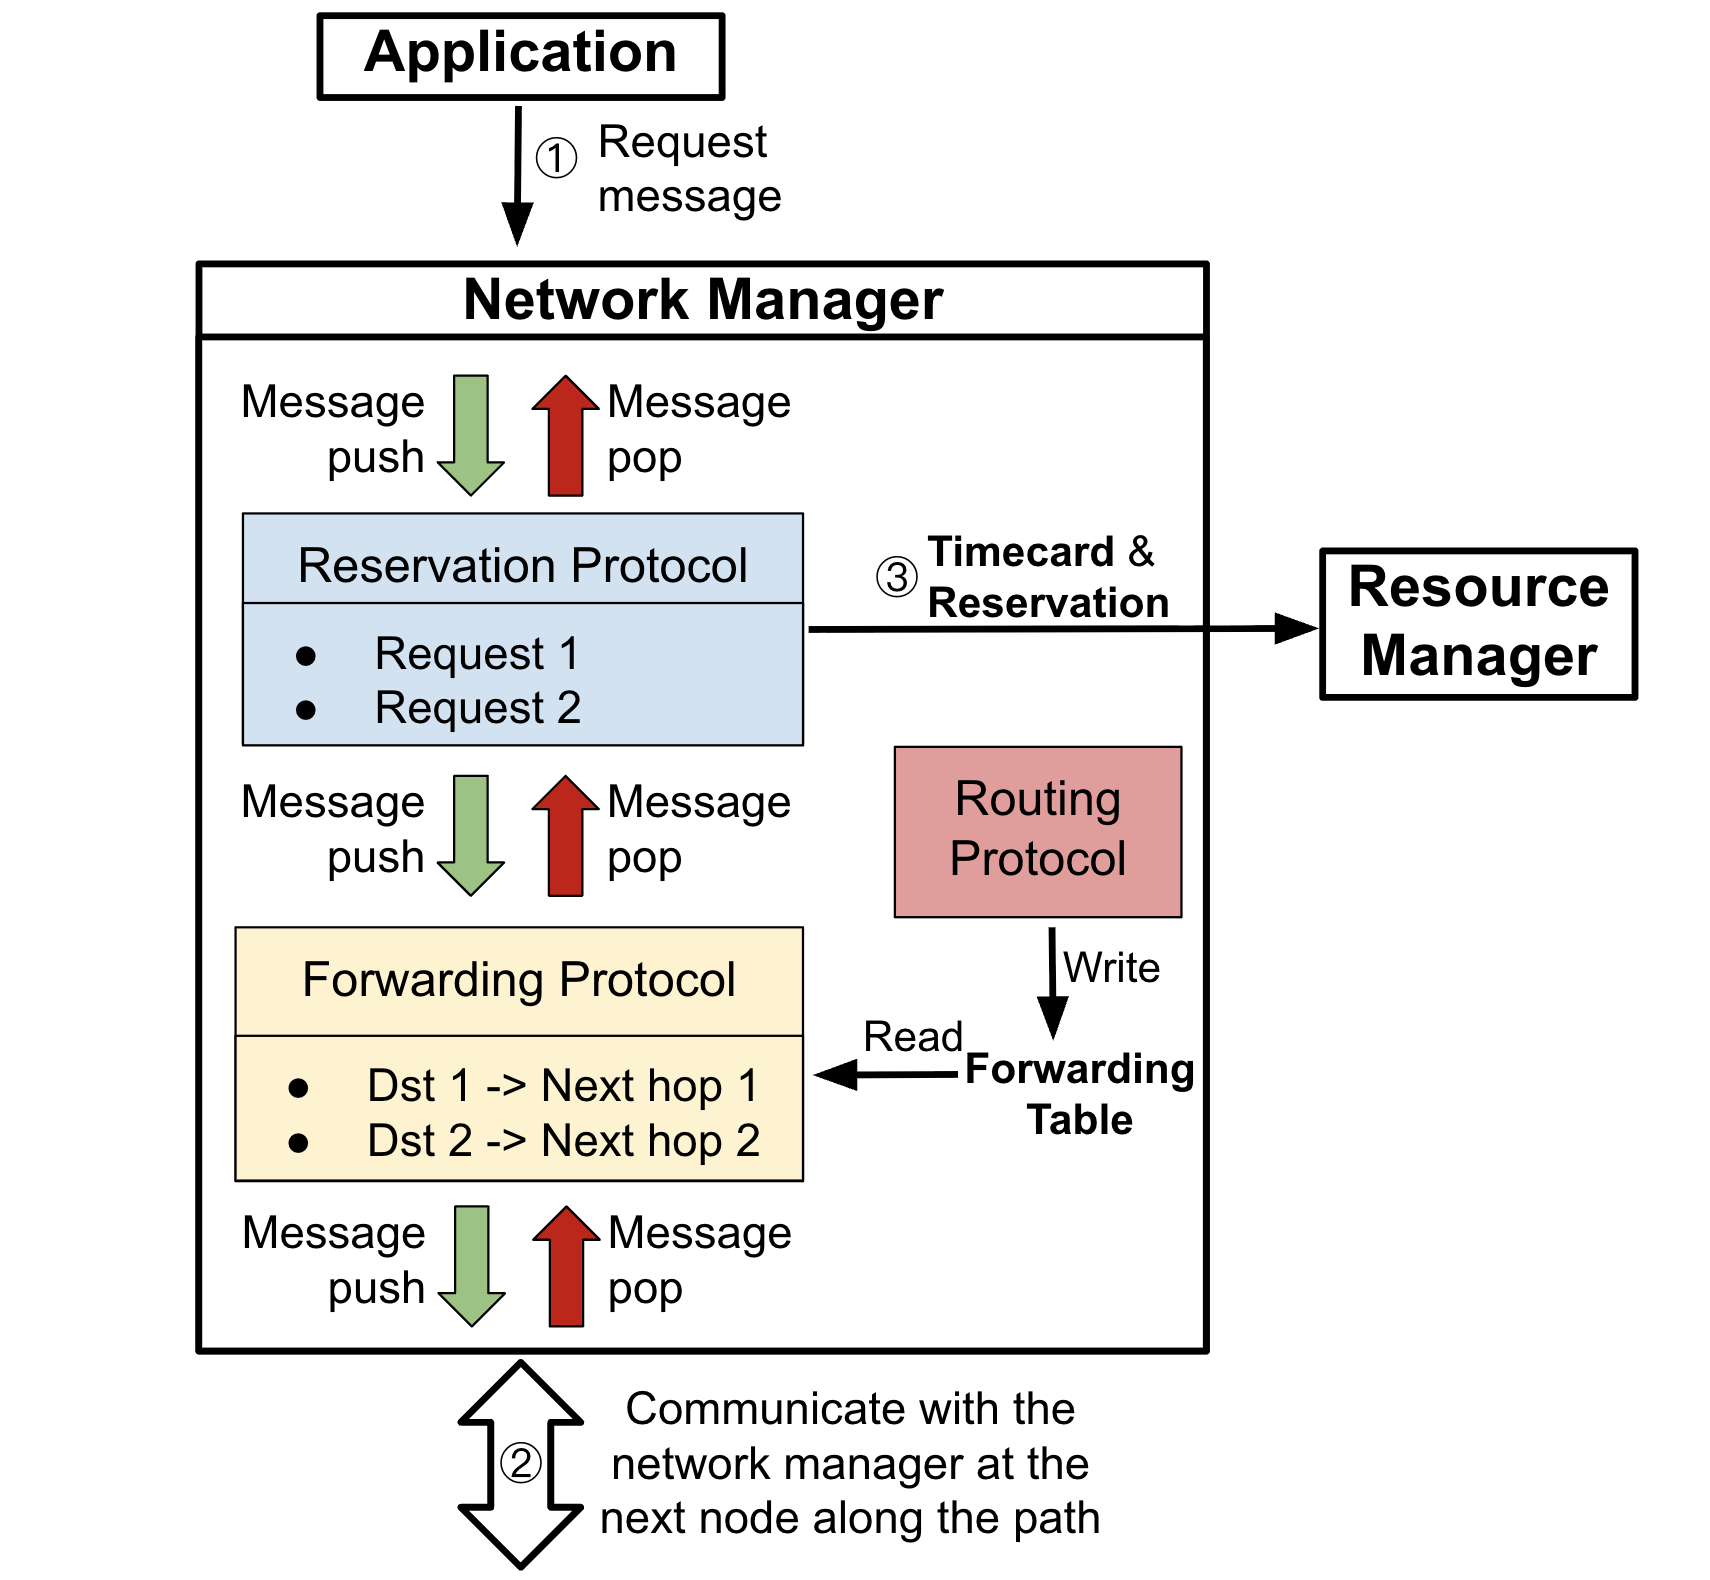
When a request is received, the Network Manager first push a message to the reservation protocol, which determines if the request can be met on the local node. If so, the protocol reserves hardware resources and passes the request to the forwarding protocol, which determines the next router in an optimal path between the requested nodes. The forwarding protocol reads the forwarding table written by the routing protocol.
Nodes in the path receive reservation requests and either reserve local resources or reject the request. If rejected on any node or accepted by all nodes, the request is sent back to the originating node by the reverse path.
If the request is accepted (requires all nodes in the path accepting the request), the reservation protocol will pass the timecard and the reservation to the Resource Manager. As described in Chapter 4, the Resource Manager will generate and install the rules once receiving the timecard and the reservation.
When constructing the network manager, the NewNetworkManager function of the sequence.network_management.network_manager module is used. This function will automatically create the default reservation and routing protocol stack and install it into the network manager.
def NewNetworkManager(owner: "QuantumRouter", memory_array_name: str, component_templates: dict = {}) -> "NetworkManager":
    """Function to create a new network manager.

    Will create a network manager with default protocol stack.
    This stack includes a reservation and routing protocol.

    Args:
        owner (QuantumRouter): node to attach network manager to.
        memory_array_name (str): name of the memory array component on owner.
        routing_protocol_cls (type[Protocol]): routing protocol class to use for control plane.

    Returns:
        NetworkManager: network manager object created.
    """
    manager = NetworkManager(owner, [])
    routing = component_templates.get("routing", "static")
    match routing:
        case "static":
            routing_protocol_cls = StaticRoutingProtocol
        case "distributed":
            routing_protocol_cls = DistributedRoutingProtocol
        case _:
            raise NotImplementedError(f"Routing protocol {routing} not implemented.")
    routing = routing_protocol_cls(owner, f"{routing_protocol_cls.__name__}")
    manager.set_routing_protocol(routing)
    forwarding_protocol = ForwardingProtocol(owner, owner.name + ".ForwardingProtocol")
    rsvp = ResourceReservationProtocol(owner, owner.name + ".RSVP", memory_array_name)
    forwarding_protocol.upper_protocols.append(rsvp)
    rsvp.lower_protocols.append(forwarding_protocol)
    manager.load_stack([forwarding_protocol, rsvp])
    return manager
Step 1: Create the Network Configuration File
For this example, we will be using a json file to specify the nodes and connectivity of the network. The json file should be structured as a dictionary with the following keys:
stop_time, the stop time of simulationnodes, giving a list of node specificationsAt least one of the following:
qchannels, giving a list of quantum channel specificationsqconnections, giving a list of two-way quantum connection specifications
At least one of the following:
cchannels, giving a list of classical channel specifications (similar toqchannels)cconnections, giving a list of two-way classical connection specifications
For this simulation, we use sequential simulation to simulate 2 seconds of the network.
"stop_time": 2000000000000
Next, we will make the nodes entry.
All fields of the list will have the name field required by the node constructor and a specification of the node type,
along with any more arguments (optional or not) specified by the specific node type.
We will be using the QuantumRouter node type for this tutorial,
which already includes all of the necessary hardware for entanglement distribution as well as all necessary modules (including network management).
The seed attribute denotes the random seed used for the random number generator on the node,
which can guarantee the reproducibility of the simulation.
The memo_size attribute defines the size of the memory array on the quantum router.
"nodes": [
  {
    "name": "center",
    "type": "QuantumRouter",
    "seed": 0,
    "memo_size": 50
  },
  {
    "name": "end1",
    "type": "QuantumRouter",
    "seed": 1
    "memo_size": 50,
  },
  {
    "name": "end2",
    "type": "QuantumRouter",
    "seed": 2
    "memo_size": 50,
  },
  {
    "name": "end3",
    "type": "QuantumRouter",
    "seed": 3
    "memo_size": 50,
  },
  {
    "name": "end4",
    "type": "QuantumRouter",
    "seed": 4
    "memo_size": 50,
  }
]
The qconnections entry should have multiple entries specifying the name of the two connected nodes and at least the attenuation and length of the fiber
(plus any additional keyword arguments).
The type of quantum connection should be specified by the attribute type.
Here, we use the predefined type meet_in_the_middle that automatically generates a BSM node in the middle of node1 and node2.
"qconnections": [
    {
      "node1": "center",
      "node2": "end1",
      "attenuation": 0.0002,
      "distance": 500,
      "type": "meet_in_the_middle"
    },
    {
      "node1": "center",
      "node2": "end2",
      "attenuation": 0.0002,
      "distance": 500,
      "type": "meet_in_the_middle"
    },
    {
      "node1": "center",
      "node2": "end3",
      "attenuation": 0.0002,
      "distance": 500,
      "type": "meet_in_the_middle"
    },
    {
      "node1": "center",
      "node2": "end4",
      "attenuation": 0.0002,
      "distance": 500,
      "type": "meet_in_the_middle"
    }
]
Finally, for the classical channels, we will specify two-way cconnections.
The node endpoints are specified by name as node1 and node2, and each communication direction will have the same delay delay.
"cconnections": [
    {
      "node1": "center",
      "node2": "end1",
      "delay": 500000000
    },
    {
      "node1": "center",
      "node2": "end2",
      "delay": 500000000
    },
    {
      "node1": "center",
      "node2": "end3",
      "delay": 500000000
    },
    {
      "node1": "center",
      "node2": "end4",
      "delay": 500000000
    },
    {
      "node1": "end1",
      "node2": "end2",
      "delay": 1000000000
    },
    {
      "node1": "end1",
      "node2": "end3",
      "delay": 1000000000
    },
    {
      "node1": "end1",
      "node2": "end4",
      "delay": 1000000000
    },
    {
      "node1": "end2",
      "node2": "end3",
      "delay": 1000000000
    },
    {
      "node1": "end2",
      "node2": "end4",
      "delay": 1000000000
    },
    {
      "node1": "end3",
      "node2": "end4",
      "delay": 1000000000
    }
]
Step 2: Build the Network
Now, we can move to our script and begin building the experiment from our json file.
The json file can be loaded with the construction function of RouterNetTopo.
Note that we have the json file saved as star_network.json here.
The RouterNetTopo will also create a timeline with 2 seconds of simulation time.
We use the function get_timeline() to get the timeline for the simulation.
from sequence.topology.router_net_topo import RouterNetTopo


network_config = "star_network.json"
network_topo = RouterNetTopo(network_config)
tl = network_topo.get_timeline()
To edit network parameters quickly, we can define a custom function to interact with the topology. This function will take one argument:
topology, theRouterNetTopoobject we wish to update.
We will edit a few hardware objects by accessing the hardware fields of network nodes. To access all nodes of a specific type in the network, we can use the topology.get_nodes_by_type method. This is useful for editing hardware objects that may only be found on one node type, e.g. memories only found on QuantumRouter nodes.
We may also wish to edit parameters of our entanglement protocols. Since these are created by a node’s resource manager, we will need to edit the appropriate fields of the resource manager on each node. This is achieved in much the same way as hardware elements.
For quantum and classical connections, the get_qchannels and get_cchannels functions of the topology will return a list of quantum channels and classical channels, respectively.
These provide an iterable list of all connections in the network that may be edited directly.
def set_parameters(topology: RouterNetTopo):
    # set memory parameters
    MEMO_FREQ = 2e3
    MEMO_EXPIRE = 0
    MEMO_EFFICIENCY = 1
    MEMO_FIDELITY = 0.9349367588934053
    for node in topology.get_nodes_by_type(RouterNetTopo.QUANTUM_ROUTER):
        memory_array = node.get_components_by_type("MemoryArray")[0]
        memory_array.update_memory_params("frequency", MEMO_FREQ)
        memory_array.update_memory_params("coherence_time", MEMO_EXPIRE)
        memory_array.update_memory_params("efficiency", MEMO_EFFICIENCY)
        memory_array.update_memory_params("raw_fidelity", MEMO_FIDELITY)

    # set detector parameters
    DETECTOR_EFFICIENCY = 0.9
    DETECTOR_COUNT_RATE = 5e7
    DETECTOR_RESOLUTION = 100
    for node in topology.get_nodes_by_type(RouterNetTopo.BSM_NODE):
        bsm = node.get_components_by_type("SingleAtomBSM")[0]
        bsm.update_detectors_params("efficiency", DETECTOR_EFFICIENCY)
        bsm.update_detectors_params("count_rate", DETECTOR_COUNT_RATE)
        bsm.update_detectors_params("time_resolution", DETECTOR_RESOLUTION)
    # set entanglement swapping parameters
    # SWAP_SUCC_PROB = 0.90
    # SWAP_DEGRADATION = 0.99
    # for node in topology.get_nodes_by_type(RouterNetTopo.QUANTUM_ROUTER):
    #     node.network_manager.protocol_stack[1].set_swapping_success_rate(SWAP_SUCC_PROB)
    #     node.network_manager.protocol_stack[1].set_swapping_degradation(SWAP_DEGRADATION)

    # set quantum channel parameters
    ATTENUATION = 1e-5
    QC_FREQ = 1e11
    for qc in topology.get_qchannels():
        qc.attenuation = ATTENUATION
        qc.frequency = QC_FREQ
We can then insert this into our script and call our function with the network_topo object:
set_parameters(network_topo)
Step 3: Making Requests
With the network built, we are now ready to make requests of the network manager and start entanglement. The request method of the network manager can be used for this. When invoked, it will automatically start the reservation process and create rules as required (see the background section). The method has 5 arguments:
responder, a string name of the other node with which to generate entangled pairsstart_time, the simulation time (in picoseconds) at which entanglement should beginend_time, the simulation time at which entanglement may end and reserved resources releasedmemory_size, the number of entangled memory pairs requestedtarget_fidelity, the desired fidelity of entanglement for all pairs
We will make one request at one network node, asking for 25 memories to be entangled starting at 1 second and ending at 2 seconds (the end of our simulation). At the end of the simulation we will print out the entanglement state of memories in a manner similar to chapter 4.
# the start and end nodes may be edited as desired
start_node_name = "end1"
end_node_name = "end2"
node1 = node2 = None

for router in network_topo.get_nodes_by_type(RouterNetTopo.QUANTUM_ROUTER):
    if router.name == start_node_name:
        node1 = router
    elif router.name == end_node_name:
        node2 = router

nm = node1.network_manager
nm.request(end_node_name, start_time=1e12, end_time=10e12, memory_size=25, target_fidelity=0.9)

tl.init()
tl.run()

print(node1, "memories")
print("Index:\tEntangled Node:\tFidelity:\tEntanglement Time:")
for info in node1.resource_manager.memory_manager:
		print("{:6}\t{:15}\t{:9}\t{}".format(str(info.index),
                                         str(info.remote_node),
                                         str(info.fidelity),
                                         str(info.entangle_time * 1e-12)))
We should notice that all memories are entangled with the specified distant node, that they have fidelity above our specified threshold, and that the entangled time is between 1 and 2 seconds.